This is an internal documentation. There is a good chance you’re looking for something else. See Disclaimer.
Setup a DevOps Work Machine
Enable Full Disk Encryption (FDE)
Important
Simply enabling encryption for your home directory is not enough.
If you already installed your OS and it doesn’t allow enabling FDE after installation, reinstall. No exceptions!
Remember that you need to type the selected passphrase on every boot. Select a reasonably-easy-to-type passphrase.
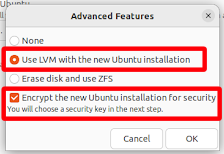
Example, enabling FDE on Ubuntu 22.04:


Set up SSH
Create a Key
ssh-keygen -t ed25519
cat ~/.ssh/id_ed25519.pub # copy key and paste in the next step
Distribute Key
Add key on https://git.tocco.ch (Your name (top right corner) → Settings → SSH Public Keys → Add Key …)
You also want to give the content of ~/.ssh/id_ed25519.pub to someone of operations. To that regard, you can post the public key in the Operations Public channel and ask for it to be granted access.
Tip
For admins: How to allow access is documented in Server Access (SSH/KVM/noVNC)
Set up Wireguard VPN
Configure VPN
Install Wireguard:
apt install openresolv wireguard wireguard-tools
Note
macOS users:
Install client from https://www.wireguard.com/install/#macos-app-store. Do not install CLI tools listed at the bottom which are unmaintained and outdated.
Generate private / public key pair:
(private=$(wg genkey); public=$(wg pubkey <<<$private); echo "private_key: $private; public_key: $public")
Note
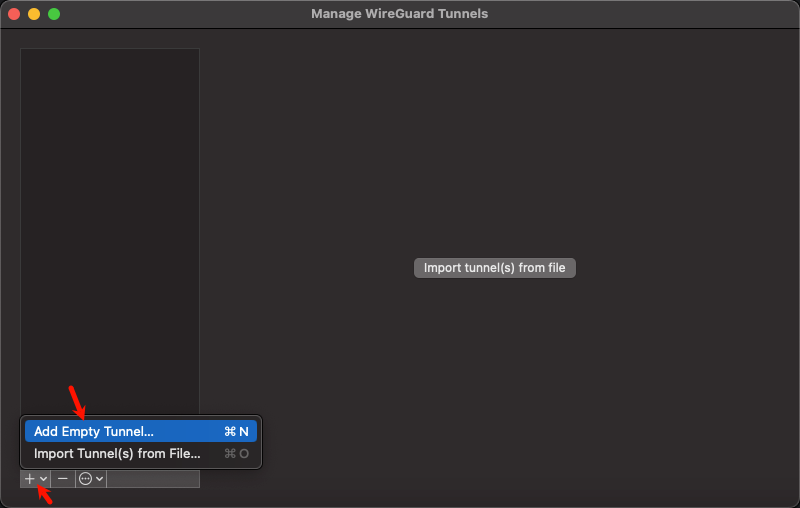
macOS users:
Add a new empty Tunnel in the “Manage WireGuard Tunnels” Menu:
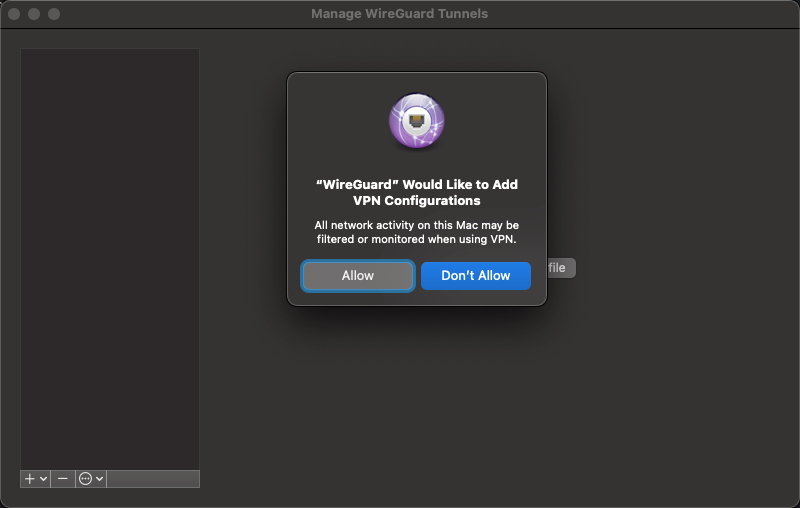
Allow adding of VPN Configurations:
This will generate an “empty” VPN configuration with a public and private key:
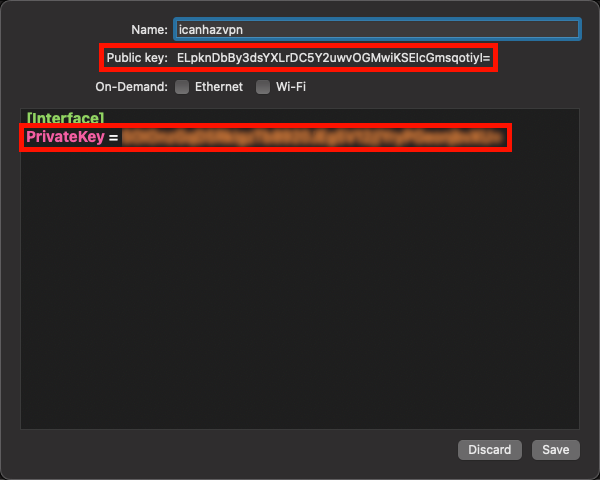
Submit the public_key to Operations Public channel and ask to be granted VPN access.
Make sure you keep the private_key, you’ll need it.
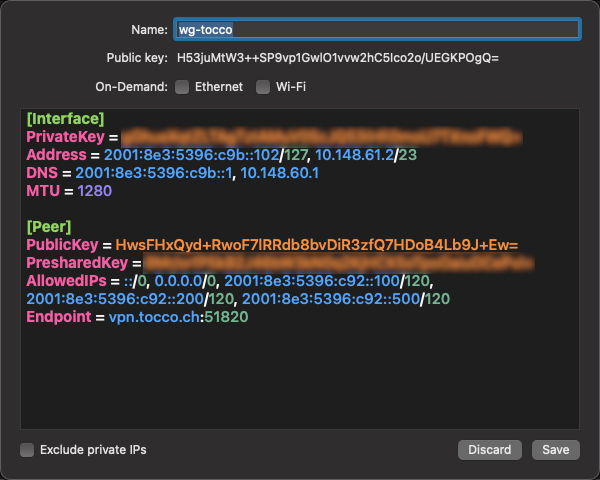
You’ll get a VPN config back. Replace the XXX placeholder in it with your private_key and then store it at /etc/wireguard/wg-tocco.conf.
Note
macOS users:
Add this configuration to your previously created VPN tunnel:
Warning
Make sure to not overwrite the private key when pasting this configuration!
Important
This is a per-device key. Generate a fresh key if you need access on an addational device. Using the same key on two devices will not work.
Tip
For admins: see Wireguard VPN.
Test VPN
Enable VPN:
wg-quick up wg-tocco
Note
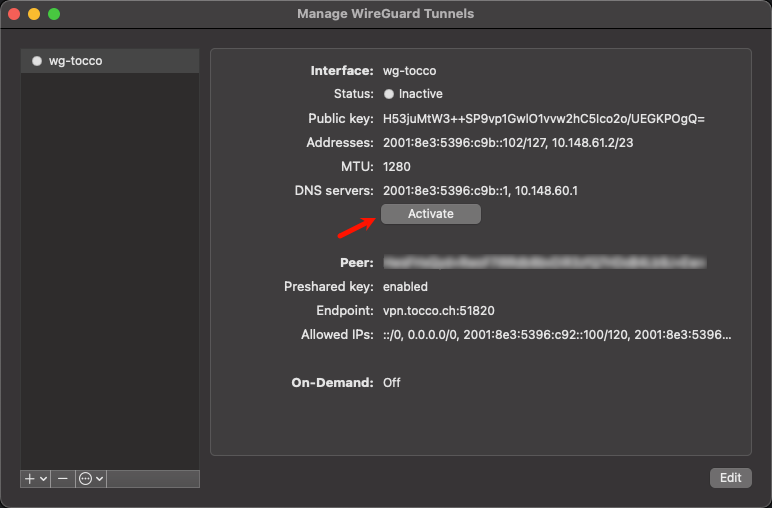
macOS users: Simply activate the config:
Test connection:
ping -A -c 3 10.148.60.1
ping -A -c 3 2001:8e3:5396:c9b::1
ping -A -c 3 tocco.ch
Note
macOS users:
ping -A -c 3 10.148.60.1
ping6 -c 3 2001:8e3:5396:c9b::1
ping -A -c 3 tocco.ch
Disable VPN:
wg-quick down wg-tocco
Note
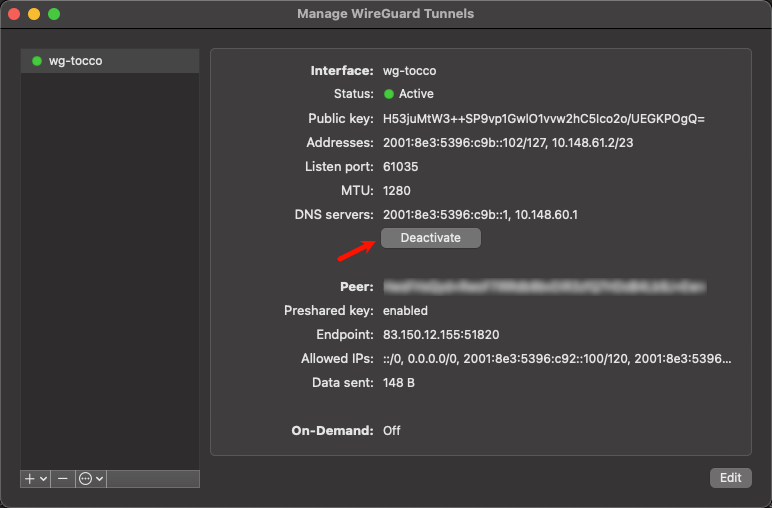
macOS users: Simply deactivate the config:
Set Up Dotfiles
Clone the tocco-dotfiles repository:
cd ~/src
git clone https://gitlab.com/toccoag/tocco-dotfiles.git
Link
authorized_keys_toccointo SSH config directory:mkdir -p ~/.ssh ln -s ~/src/tocco-dotfiles/ssh/known_hosts_tocco ~/.ssh/
Adjust the path if your repository clone is located elsewhere.
Add scripts to $PATH by adding this to
~/.profile:PATH="$PATH:$HOME/src/tocco-dotfiles/bin" export PATH
Note
$PATH is adjusted only on newly opened terminals. Run the commands manually or restart your terminal should you need any commands added to $PATH.
Configure SSH
Include config and set user name:
cat >>~/.ssh/config <<EOF
# First entry wins. So, override settings here, at the top.

Host *.tocco.cust.vshn.net
    User \${FIRST_NAME}.\${LAST_NAME}

# Comment in if you want to login as 'tadm' by default instead as 'tocco' (root permissions required).
# Host *.tocco.ch
#     User tadm

Host *
    Include ~/src/tocco-dotfiles/ssh/config
EOF
Replace ${FIRST_NAME}.${LAST_NAME} like this: peter.gerber.
Adjust the path following the Include directive if the repository clone you created previously, in Set Up Dotfiles, is located elsewhere.
Setup Git
Install Git
Debian-Based Systems
apt install git
OSX Systems
If you are running OSX, you have git already installed. You can check the installed version using git -v.
If the installed version is not to your liking (or you are unable to update your OSX for some reason), you can create a separate git installation using brew and keep that on the version that you prefer. Brew will overwrite the linking of the git command for you, so that the brew version will be executed instead of the system version.
Configure Git
git config --global user.email "${USERNAME}@tocco.ch"  # replace ${USERNAME} with pgerber, …
git config --global user.name "${YOUR_NAME}"  # replace ${YOUR_NAME} with "Peter Gerber", …
Ignore some files in all repository by default:
Debian-Based Systems
mkdir -p ~/.config/git
cat >>~/.config/git/ignore <<EOF
.idea/
*~
.*.swp
EOF
OSX Systems
The first command creates a new global gitignore file and the second command tells your git to use this new file for global ignores.
touch ~/.gitignore_global
git config --global core.excludesfile ~/.gitignore_global
cat <<EOT >> ~/.gitignore_global
.DS_Store
.idea/
EOT
Setup IDEA
Install IDEA
Download the latest version and extract it:
cd ~/Download
wget https://download-cf.jetbrains.com/idea/ideaIC-XXXX.X.X.tar.gz
cd ~/install   # or wherever you want to install it
tar xf ~/Download/ideaIC-XXXX.X.X.tar.gz
ln -s ~/Download/ideaIC-XXXX.X.X idea
mkdir -p ~/bin
ln -s ~/install/idea/bin/idea.sh ~/bin/idea
rm ideaIC-XXXX.X.X.tar.gz
If an update is released that forces you to download a new *.tar.gz file, extract it and replace the link
in ~/install/ using ln -sfn ideaIC-XXXX.X.X idea.
Hint
This assumes that ~/bin is in your $PATH which is the case on most Linux-based systems. If you had
to create ~/bin, you may have to close and reopen the terminal for it to be added to $PATH.
If necessary, add it manually to $PATH by adding this to ~/.profile:
export PATH="$HOME/bin:$PATH"
Create Desktop Entry
open idea and find Tools → Create Desktop Entry… (or Configure → Create Desktop Entry… on
the welcome screen).
Generate GUI into Java Source Code
Hint
This step is only required if you run nice version 2.29 or older
Find File → Settings (or Configure → Settings on welcome screen).
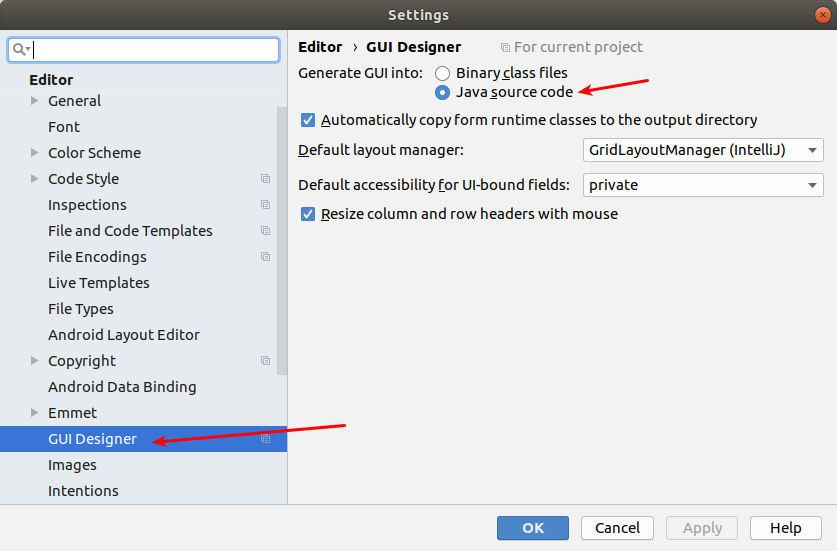
Select “Generate GUI into: Java source code”
Change default encoding for properties files
Open File → Settings → Editor → File Encodings and change Default encoding for properties files to UTF-8
Install Gerrit Plugin
Install Plugin under File → Settings → Plugins and search for Gerrit
Restart IDEA
Configure the plugin under File → Settings → Version Control → Gerrit
Web-URL: https://git.tocco.ch
Login: swuersten (your email address without @tocco.ch)
Password: ******
Enable “Push commits to Gerrit by default”
Increase Memory Available to IDEA
Help → Edit Custom VM Options…
Say Yes to create a config file
Set max. memory (-Xmx) to something sensible (e.g. -Xmx3096m)
Increase Memory IDEA Uses for Maven Import
Hint
This step is only required if you run nice version 2.29 or older
In Idea’s main window: File → Settings → Build, Execution, Deployment → Build Tools → Maven → Importing → VM options for Importer set memory to -Xmx1024m (Increase this even further if Maven import fails due to out of memory.)
Increase Watch Limit (Linux only)
Create the file /etc/sysctl.d/50-idea.conf with the following content:
fs.inotify.max_user_watches=524288
Then load it with this command:
sysctl -p /etc/sysctl.d/50-idea.conf
Install Java
Required Java versions:
Java Version
Nice Versions
11
2.20 - 3.0
17
3.1 - 3.9
21
3.10 -
Debian-Based Systems
Install default JDK:
apt install default-jdk
… or install a particular version:
# install Java 17
apt install openjdk-17-jdk
Alternative sources:
Debian-only:
Most recent Java LTS version are usually available via backports:
cat >>/etc/apt/source.list.d/backports <<EOF
deb https://deb.debian.org/debian $(lsb_release -cs)-backports main
EOF

apt update

# install Java 11
apt install openjdk-11-jdk
Any Linux distribution:
Setup Maven
Hint
This step is only required if you run nice version 2.29 or older
Install Maven
Debian-Based Systems
apt install maven
Support Multiple Java Versions
Add aliases to ~/.bash_aliases (adjust versions as needed):
alias mvn11="JAVA_HOME='/usr/lib/jvm/java-11-openjdk-amd64' mvn"
This will allow you to run mvn using an explicit java version. Examples:
You may also want to use ``-DskipEirslett`` to speed up the build, see
`maven-eirslett`_.

# Java 11
mvn11 -pl customer/test -am clean install -DskipTests
See Maven about Eirslett.
Hint
Close and reopen the terminal for mvn11 to become available.
Configure Maven
Memory Settings
By default, the memory limit is based on available memory but that might not always be enough.
echo 'export MAVEN_OPTS="-Xmx1024m"' >>~/.profile
Important
Close and reopen your terminal for the changes to take effect.
Repository Access
Add the following snippet to the ~/.m2/settings.xml file (Ask one of your colleagues to get the USERNAME and PASSWORD):
<settings xmlns="http://maven.apache.org/SETTINGS/1.0.0"
  xmlns:xsi="http://www.w3.org/2001/XMLSchema-instance"
  xsi:schemaLocation="http://maven.apache.org/SETTINGS/1.0.0
                      http://maven.apache.org/xsd/settings-1.0.0.xsd">
  <servers>
    <server>
      <id>tocco-nice2</id>
      <username>USERNAME</username>
      <password>PASSWORD</password>
    </server>
    <server>
      <id>tocco-nice2-plugins</id>
      <username>USERNAME</username>
      <password>PASSWORD</password>
    </server>
  </servers>
</settings>
Increase Max. Number of Open Files
Create /etc/security/limits.d/open_file_limit.conf with this content:
* - nofile 1000000
Hint
Only effective once you logged out and in again.
If you encounter too-many-files-open errors during mvn build, check out
“Too many open files” During Maven Build.
Setup Gradle
Hint
This step is only required if you run nice version 3.0 or newer
There is no installation of gradle necessary as the gradle wrapper is used.
Repository Access
Add the following snippet to the ~/.gradle/gradle.properties file (Ask one of your colleagues to get the USERNAME and PASSWORD):
nice2_repo_username=USERNAME
nice2_repo_password=PASSWORD
Increase Max. Number of Open Files
Install Dependencies
On Ubuntu install the following dependencies:
apt install libjpeg62 libpng16-16
(there libraries are dynamically loaded by wkhtmltopdf)
On Ubuntu 22.04 and newer install the following dependencies. If there is a newer version released already, the version numbers in the command need to be adjusted.
wget http://nz2.archive.ubuntu.com/ubuntu/pool/main/o/openssl/libssl1.1_1.1.1f-1ubuntu2.19_amd64.deb
sudo dpkg -i libssl1.1_1.1.1f-1ubuntu2.19_amd64.deb
This fixes the issue “cannot open shared object file: No such file or directory”.
Hint
This step is only required if you run nice version 3.0 or newer
On macOS add the gradle property wkhtmltopdfClassifier=osx to ~/.gradle/gradle.properties
Clone and Build Nice2
mkdir ~/src
cd ~/src
git clone ssh://${USERNAME}@git.tocco.ch:29418/nice2  # replace ${USERNAME} with pgerber, …
cd nice2
scp -p -P 29418 ${USERNAME}@git.tocco.ch:hooks/commit-msg .git/hooks/  # replace ${USERNAME} with pgerber, …
git checkout ${BRANCH} # replace ${BRANCH} either with integration/master or integration/releases/${VERSION} where ${VERSION} is for example 2.29
Hint
Recent versions of scp have switched to sftp as underlying protocol. Gerrit does not currently support this protocol and you may see this error:
subsystem request failed on channel 0
scp: Connection closed
In such a case, enable the legacy protocol via -O flag:
scp -O -p -P 29418 ${USERNAME}@git.tocco.ch:hooks/commit-msg .git/hooks/ # replace ${USERNAME} with pgerber, …
Build nice version 2.29 and earlier
Test if Maven build works:
cd ~/src/nice2
mvn11 -am install -T1.5C -DskipTests  # add "-Dmac" on macOS
Build nice version 3.0 and newer
Test if Gradle build works:
cd ~/src/nice2
./gradlew build -x test
Create IDEA Project (Nice2 Integration)
open idea and find File → New → Project from Existing Sources… and follow the steps described below
select root directory of your nice2 clone (e.g.
~/tocco/src/nice2-2.25)click OK
choose option Import project from external model → Maven (or Gradle for version 3.0 and newer)
click Finish
open new project either in a new window or in the existing window
Tip
It is recommended to create different git clone and idea project for each available version. For example one clone and project for master, one for v2.24, one for v2.25 and so on.
Hint
Note that there is already a run configuration for customer test ready to use (called “Start Nice2 (customer ‘test’)”).
If you need to run a different customer, just duplicate that run config and change the directory in the field Gradle project to your customer.
From version 3.5 on, the Nice instance gets a max memory of 1.2G (see -PjvmArgs=’-Xmx1200m’ in the run command in the run config). If this isn’t enough for your task at hand, you can increase the max memory by changing the number in the run config.
Caution
However, you shouldn’t carelessly increase the number if you’re running out of memory locally - it is probable that there’s something wrong, as 1.2G should be plenty enough to run any process within the Nice instance.
Setup OpenShift Client
Install Client
Tip
If you are running MacOS, just run brew install openshift-cli and ignore the rest of this chapter.
Download the client from the OpenShift Command Line Tools Page, extract it and
move the oc binary into $PATH:
cd ~/Download
tar xf oc.tar
mkdir -p ~/bin
mv oc ~/bin/
ln -s ~/bin/oc ~/bin/kubectl
rm oc.tar
Enable Autocompletion
cat >>~/.bashrc <<EOF
eval \$(oc completion bash)
EOF
Install Docker (Optional)
Find your OS here and follow the instructions.
S3 Access Key
Ask operations (e.g. via Operations Public channel) to issue you an access key for our S3 storage.
Once you retrieved the key, add it to ~/.aws/credentials like this:
[nice2]
aws_access_key_id=XXXXXXXXXXXXXXXXXXXX
aws_secret_access_key=XXXXXXXXXXXXXXXXXXXXXXXXXXXXXXXXXXXXXXXX
The section must be called nice2, the name is hardcoded in Nice2.
Tip
For admins: how to issue a key is described in Create User.
S3 Access via s3cmd (Optional)
Install s3cmd:
apt install s3cmd
Configure s3cmd:
s3cmd --configure
Select the default for all options.
Adjust the following configuration entries in ~/.s3cfg:
[default]
access_key = XXXXXXXXXXXXXXXXXXXX
secret_key = XXXXXXXXXXXXXXXXXXXXXXXXXXXXXXXXXXXXXXXX
host_base = objects.rma.cloudscale.ch
host_bucket = %(bucket)s.objects.rma.cloudscale.ch
The access and secret keys are the keys you obtained in the previous step.
Test access:
s3cmd info s3://tocco-nice-test >/dev/null
# no output expected
GitLab Account
-
You can create/reuse your personal account or create a Tocco-specific one. This is up to you.
-
Retrieve key:
cat ~/.ssh/id_ed25519.pub -
You can use an authenticator app like andOTP for this or a U2F device (if you own one).
Publish your username in the Slack channel public_operations and ask to be added to the group toccoag.
Setup Ansible
Hint
The following instruction have been tested on Debian, for other operating systems make sure you have this installed:
Python3
Ansible >= 2.7
And these Python packages:
dnspython
boto3
openshift
psycopg2
Install Ansible and dependencies:
apt install ansible python3-boto3 python3-dnspython python3-psycopg2 python3-openshift python3-passlib
Note
python3-openshift has only been available since Debian 12 “bookworm” and Ubuntu 22.10 “kinetic”. Install from pip on older versions:
apt install python3-pip
pip3 install openshift
Clone the repository:
mkdir -p ~/src
cd ~/src
# Access to group "toccoag" required
git clone git@gitlab.com:toccoag/ansible.git
Get Ansible Vault password(s)
Ansible Vault is used to store sensitive data (password, API keys) encrypted. You need a password to access them.
There is two Vaults:
One Vault that expects a file containing the password at
~/.ansible-password. This Vault is needed for server management and you generally only need it if you’re a part of the operations team.The second Vault expects a file containing the password at
~/.ansible-tocco-password. This Vault is need to manage our application and is generally needed by devs and ops.
Ask one of your colleagues to get the Vault passwords and store in said files. Be sure to set proper permission on the files:
(umask 0077; echo ${PASSWORD_GOES_HERE} >~/.ansible-password)
(umask 0077; echo ${PASSWORD_GOES_HERE} >~/.ansible-tocco-password)
Setup Postgres
Install Postgres:
sudo apt install postgresql
Note
If you are running macOS, it is recommended that you install the multi-version app. This app allows you to run multiple postgres versions simultaneously and makes switching between versions easy. To install this app, browse to https://postgresapp.com/downloads.html and download the first installer under “Additional Releases” called “Postgres.app with all currently supported versions (Universal/Intel)”.
Setup Postgres for use with Ansible:
sudo apt install zstd
sudo -u postgres psql -c "CREATE ROLE \"$(id -un)\" WITH LOGIN SUPERUSER"
psql -c "CREATE DATABASE \"$(id -un)\"" postgres
The above is required to make sure Ansible can be used to copy databases. This creates a Postgres user with admin rights and with the same name as the Linux user. This allows to login via Unix socket without providing credentials.
Setup Postgres for local development
Initially create role and user:
CREATE ROLE nice_local WITH LOGIN SUPERUSER PASSWORD 'SET_YOUR_PASSWORD';
Add an
application-development.propertiesfile to the customer (pathcustomer/NAME/src/main/resources):hibernate.main.serverName=localhost hibernate.main.user=nice_local hibernate.main.password=SET_YOUR_PASSWORD
See Copy Database on how to copy a database to your local postgres server. If the database name is not the same as defined in
application.propertiesalso sethibernate.main.databaseName.
Setup tco (Optional)
tco is a helper tool for anyone and contains many useful commands. See the tco repository
for installation instructions.
Note
On some machines, installation was not possible until the following packages were installed.
sudo apt install libssl-dev pkg-config build-essential
Setup Tocco Client (Optional)
See Setup
Setup Thunderbird as Mail Client (Optional)
Personal Inbox
Enter your full name
Enter mail address (<your-name>@tocco.ch)
Skip password
Select Configure manually
Use these settings:
Incoming server:
protocol: IMAP
server name: outlook.office365.com
port: 993
security: SSL/TLS
authentication method: OAuth2
Username: <your-name>@tocco.ch
Outgoing server:
protocol: SMTP
server name: smtp.office365.com
port: 587
security: STARTTLS
authentication method: OAuth2
Username: <your-name>@tocco.ch
Click Done
Enter your password
Check all Folders for Incoming Mail
If you wish for Thunderbird to check all folders for mail:
Go to Preferences → Advanced → General → Config Editor…:
Set mail.server.default.check_all_folders_for_new to true.
admin@tocco.ch Inbox (DevOps / Admins Only)
admin@tocco.ch is a shared inbox used by Operations.
Open Account Settings
Account Actions → Add Mail Account…
Enter your full name
Enter admin@tocco.ch as mail address
Skip password
Select Configure manually
Use these settings:
Incoming server:
protocol: IMAP
server name: outlook.office365.com
port: 993
security: SSL/TLS
authentication method: OAuth2
Username: admin@tocco.ch
Outgoing server:
protocol: SMTP
server name: smtp.office365.com
port: 587
security: STARTTLS
authentication method: OAuth2
Username: admin@tocco.ch
Click Done
Select Sign in with other account and use your regular username (i.e. <your-name>@tocco.ch) and password to log in.