This is an internal documentation. There is a good chance you’re looking for something else. See Disclaimer.
Add Non-Customer Module
Adding a new module contains the following steps:
Nr |
Required |
Description |
|---|---|---|
1 |
✔ |
|
2 |
✔ |
|
3 |
✔ |
|
4 |
✔ |
|
5 |
||
6 |
||
7 |
✔ if 5 is done |
Add Module in Backoffice
Each existing module (core, optional and core) must be documented in our Backoffice. This is important because depending on the documented modules the pom.xml will be generated for customer modules.
Open the Entity
Modulein the backoffice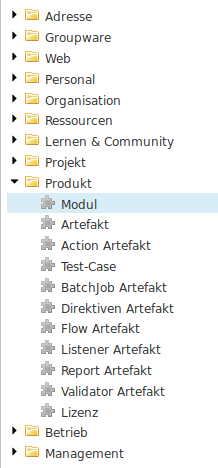
Create a new Module entitiy
Set a good technical name. The technical name should be the same as it will be called in the folder structure of the nice project
Set the correct type of the module. One of
core,optional,customerorbetween.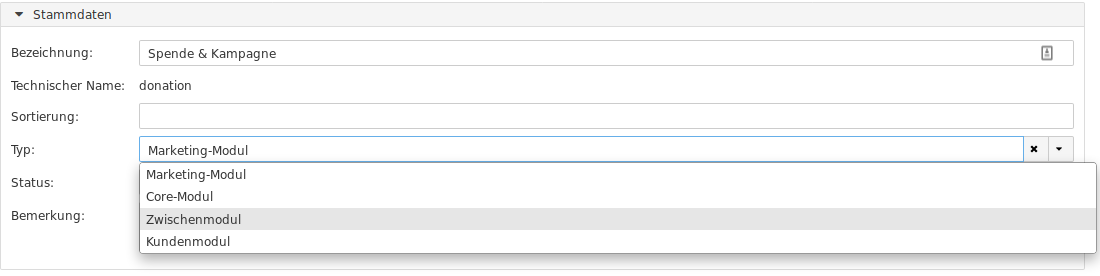
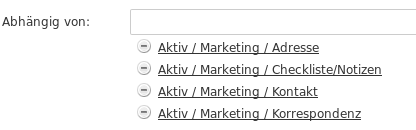
Add all required modules. Depending modules are all modules which are used by the new module. This is important because if this module later is added to a customer all depending modules also need to be added to the customer.
Create Basic Folder Structure
Note
For the purpose of this example, an optional module is created. For intermediate modules only
the name differs and for core modules the path differs. Namely, core module are placed outside
the optional directory.
Create module file hierarchy:
$ mkdir optional/${MODULE}
$ cd optional/${MODULE}
$ ../../src/bin/mkappmodule.sh
This creates the following files within opitonal/${MODULE}:
module/desriptor/hivemodule.xml |
HiveApp configuration |
module/hiveapp-mount.properties |
Make resources available in virtual filesystem provided by HiveApp. This allows mounting files and directories defined in other modules. |
module/pom.xml |
Configuration of build-time resources. |
api/ |
Submodule containing APIs |
impl/ |
Submodule containing module specific implementations. |
spi/ |
Submodule containing classes for use by other modules |
pom.xml |
Module configuration including dependency configuration. |
Add new Module to the Root Pom
Each module must be registered in the root pom file. Open the file pom.xml and add your module to it.
The modules are ordered alphabetically and are separated by core and optional modules.
  <modules>
    <!-- ... more modules -->
    <module>optional/membershiphierarchylicence</module>
    <module>optional/membershiporder</module>
    <module>optional/membershipsms</module>
    <module>optional/${MODULE}</module>
    <module>optional/netmobile</module>
    <module>optional/news</module>
    <module>optional/newsletter</module>
    <module>optional/newsletterrecipient</module>
    <!-- ... more modules -->
  </modules>
Add new Module to the Test Customer
The test customer has all available modules installed. So a newly created optional module must be added to it. Open the
file customer/test/pom.xml and add the new module at the right place as dependency to it. All modules
are added in alphabetical order.
   <dependencies>
     <!-- ... more modules -->
     <dependency>
       <groupId>ch.tocco.nice2.optional.membershipsms</groupId>
       <artifactId>nice2-optional-membershipsms-module</artifactId>
       <version>${project.parent.version}</version>
       <type>appmodule</type>
       <scope>compile</scope>
     </dependency>
     <dependency>
       <groupId>ch.tocco.nice2.optional.${MODULE}</groupId>
       <artifactId>nice2-optional-${MODULE}-module</artifactId>
       <version>${project.parent.version}</version>
       <type>appmodule</type>
       <scope>compile</scope>
     </dependency>
     <dependency>
       <groupId>ch.tocco.nice2.optional.cms</groupId>
       <artifactId>nice2-optional-cms-module</artifactId>
       <version>${project.parent.version}</version>
       <type>appmodule</type>
       <scope>compile</scope>
     </dependency>
     <!-- ... more modules -->
   </dependencies>
Add Content to module Folder
Inside the module folder optional/${MODULE}/module different folders which configure the module can
be added. Here are the most common use cases:
model
The model folder must be added as soon as you need to
add or adjust entities or relations -> see Entities and Relations
add or adjust text resources -> see Text-Resources
add or adjust forms (list, search, detail) -> see Forms
add or extend a menu (settings or modules) -> see Menu
add reports -> see Reports
db Inside the db folder changesets are placed. See document Changesets.
acl Inside the acl folder all acl rule files are located. See chapter ACL
resources Inside the resources folder JS files are placed. For actions and public flows.
outputtemplate Inside this folder FTL templates are placed which for example can be used for reports.
Add Java Source Folders
As soon as any Java code is needed (e.g. for listeners, actions, services, rest-resources, …) a Java module has to be added to the module. There are three different types of Java modules which can be added.
api -> defines services which can be injected by other modules
spi -> defines classes which other modules can use or extend.
impl -> the implementation of the module specific Java code
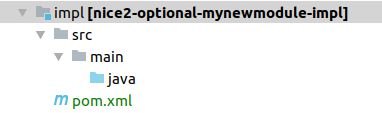
For instance, to create an impl module, create optional/${MODULE}/impl and add the following folder structure.
If an api or spi module has to be added, replace impl with api or spi respectively.
Open the file optional/${MODULE}/impl/pom.xml and add the following content.
<?xml version="1.0" encoding="UTF-8"?>

<project xmlns="http://maven.apache.org/POM/4.0.0"
         xmlns:xsi="http://www.w3.org/2001/XMLSchema-instance"
         xsi:schemaLocation="http://maven.apache.org/POM/4.0.0 http://maven.apache.org/xsd/maven-4.0.0.xsd">

  <modelVersion>4.0.0</modelVersion>

  <groupId>ch.tocco.nice2.optional.mynewmoule</groupId>
  <artifactId>nice2-optional-mynewmodule-impl</artifactId>
  <packaging>jar</packaging>
  <version>1.0-SNAPSHOT</version>

  <name>nice2-optional-mynewmodule-impl</name>

  <parent>
    <groupId>ch.tocco.nice2.optional.mynewmodule</groupId>
    <artifactId>nice2-optional-mynewmodule</artifactId>
    <version>1.0-SNAPSHOT</version>
    <relativePath>../pom.xml</relativePath>
  </parent>

  <dependencies>
    <!-- add all needed dependencies -->
  </dependencies>

</project>
Now the impl module has to be added to the module pom. Open the file optional/${MODULE}/pom.xml and add the impl module to the
modules element.
<modules>
  <module>module</module>
  <module>impl</module>
</modules>
Now the impl module also has to be added as dependency to the module pom. Open the file optional/${MODULE}/module/pom.xml and add
the impl module as dependency.
<dependencies>
  <dependency>
    <groupId>ch.tocco.nice2.optional.${MODULE}</groupId>
    <artifactId>nice2-optional-${MODULE}-impl</artifactId>
    <version>1.0-SNAPSHOT</version>
    <type>jar</type>
    <scope>compile</scope>
  </dependency>
</dependencies>
Now Java files can be added in the folder java.
Include Resources in Maven Archive
All resources must be included in the Maven Archive to ensure they are shipped with the archive which is
used to ship the application during deployments. Otherwise, resources may be missing during runtime.
Usually, resources have one of these file extensions: *.xml, *.acl, *.properties, *.js,
*.ftl.
To include files or directories into the archive, declare the resources in optional/${MODULE}/module.
Add all resource types you have added in your module folder by appending them to the build element.
Take a look at the following example:
 <build>
   <resources>
     <resource>
       <directory>descriptor</directory>
       <includes>
         <include>hivemodule.xml</include>
       </includes>
       <targetPath>.</targetPath>
     </resource>
     <resource>
       <directory>model</directory>
       <includes>
         <include>**/*.xml</include>
         <include>**/*.properties</include>
       </includes>
       <targetPath>model</targetPath>
     </resource>
     <resource>
       <directory>acl</directory>
       <includes>
         <include>*.acl</include>
       </includes>
       <targetPath>acl</targetPath>
     </resource>
     <resource>
       <directory>db</directory>
       <includes>
         <include>**/*.xml</include>
       </includes>
       <targetPath>db</targetPath>
     </resource>
  </resources>
</build>
create a
resourceelement for each folder with resourcesinside the
directoryelement the folder which contains any resources must be set.inside the
includeelement it is specified what kind of files from this folder are included in the archive.