This is an internal documentation. There is a good chance you’re looking for something else. See Disclaimer.
4 weeks before release: Create release branches
Backend release
Create branches
Note
Before you start, make sure that as many Gitlab MRs as possible are closed and merged. Otherwise they will not be merged into the correct version and need to handled manually. Check https://gitlab.com/toccoag/nice2/-/merge_requests for open MRs with master as their target.
The branches have to be created inside Gitlab. If you create them locally, you will not be able to push them to the repo. See https://gitlab.com/toccoag/nice2/-/branches/new.
Branch Name: releases/${NEW_VERSION}, Initial Revision: master
Branch Name: integration/releases/${NEW_VERSION}, Initial Revision: releases/${NEW_VERSION}
Create a new merge request branch workflow under Nice Repo Settings -> Merge Requests -> Merge request branch workflow.
Create new auto merge
Note
You need to be admin in TeamCity to be able to change the Nice2 Auto Merge build configurations.
Create integration/releases/${NEW_VERSION} -> releases/${NEW_VERSION}:
Name: integration/releases/${NEW_VERSION} -> releases/${NEW_VERSION}
Based on template: Auto Merge
run_tests: true
source-branch: integration/releases/${NEW_VERSION}
target-branch: releases/${NEW_VERSION}
Create releases/${NEW_VERSION} -> integration/master
Name: integration/releases/${NEW_VERSION} -> integration/master
Based on template: Auto Merge
run_tests: false
source-branch: releases/${NEW_VERSION}
target-branch: integration/master
Rename releases/${LAST_VERSION} -> integration/releases/${NEW_VERSION} (check https://tocco.ch/tocco/e/Version/list to find out {LAST_VERSION})
Adjust parameters in all build configs accordingly
Make sure to change the build counters to 1 for all new configurations
Change the order of the build configs according to merge order. Use Reorder button in Nice2 Auto Merge.
Create new test system
Create new test system (Use test migration. The main difference is that the database of the previous release installation should be used as template and the ansible configuration of the previous release should be used as template)
Remove old test system(s)
Keep master and the most recent 9 test systems. Remove any older test system.
In other words, keep the following test systems:
just created
the six supported versions
two latest unsupported versions
See Remove Tocco Installation / WordPress Instance / Customer
Change version in files
Change version in these files in the master branch:
boot/src/main/resources/ch/tocco/nice2/boot/impl/default.properties
core/web-core/resources/resources/webapp/js/version.js
Example commit: a1a435f25e040046bd12f1685aee7eb88fa7f4a6
Update version in .gitlab-ci.yml by adjusting UPGRADE_FROM_VERSION:
UPGRADE_FROM_VERSION: '3.5'
Warning
This is the version of the version being released, and not master. So, if master is 3.6, version 3.5 is to be used here.
Change the database of the test customer in the created release branch by editing customer/test/src/main/resources/application.properties:
Update
hibernate.main.databaseNameto include ${NEW_VERSION}
Example commit: f73b7bea7c116bb3bf8b396ff7a8041fbd4fefdc
Warning
The commit will be merged into master automatically and needs to be reverted there.
Update Initial Values
Run the scripts as explained in section Initial Value Generator to update the initial values in the integration/master branch. Add a comment on the release branch issue if no updates were available.
Docker image for DB refactoring
The db-update job in GitLab CI uses a database from the previous release to do a test upgrade. Thus, when creating a release we need a DB snapshot:
Placeholders used:
VERSION |
Version of the branch being created (e.g.
|
TEST_NAME |
Name of the test system you created in
create new test system (e.g. |
- It is recommended that you open three terminals:
db terminal:
ssh -t db5.stage.tocco.cust.vshn.net psql postgresvm terminal:
ssh -t db5.stage.tocco.cust.vshn.netlocal terminal (just open a new shell)
The instructions start on the local terminal.
If you haven’t yet, clone nice2-postgres-for-testing:
git clone git@gitlab.com:toccoag/nice2-postgres-for-testing.git
Update repository:
git fetch
Make sure LFS (Large File Support) is enabled:
Linux users:
apt install -y git-lfs
git lfs install
Mac Users:
brew install git-lfs
git lfs install
Create a new branch:
git checkout -b postgres-17-nice-${VERSION}-test origin/postgres-17Copy DB:
Note
Switch to the db terminal.
Kill database connections if necessary:
SELECT pg_terminate_backend(pg_stat_activity.pid) FROM pg_stat_activity WHERE pg_stat_activity.datname = 'nice\_\ **{TEST_NAME}**\ ' AND pid <> pg_backend_pid();
CREATE DATABASE nice_${TEST_NAME}_temp WITH TEMPLATE nice_${TEST_NAME};Select the newly created database:
\c nice_${TEST_NAME}_temp;Set password to nice for all users:
UPDATE nice_principal SET password = 'PBKDF2WithHmacSHA512:4096:512:136i33Zron48aOYDBvtbAg==:MRf3U+h9JiB5ZNEZ57VQWvCmE5yQ1IH1tTYz2ec+ZdWN/6ZtfAemXNuFd3gMLzwhy2X9e7Jt1VdmzHahInJoXA==';
(Hash of the password used for integration tests. Not to be used for production data.)
Dump DB:
Note
Switch to VM terminal.
pg_dump -Fc -f nice.psql nice_${TEST_NAME}_tempDrop DB:
Note
Switch to db terminal.
DROP DATABASE nice_${TEST_NAME}_temp;Copy DB:
Note
Switch to local terminal.
Also double-check that you are currently inside your local repo of nice2-postgres-for-testing. Otherwise the “dumps” folder will not be found.
scp db5.stage.tocco.cust.vshn.net:nice.psql dumps/nice.psql
Remove dump on server:
Note
Switch to VM terminal.
rm nice.psql
Commit:
Note
Switch to local terminal.
git add dumps/nice.psql
git diff --staged
git commit -m 'Add database'
Push change:
git push -u origin HEAD
(Image is built automatically after push.)
Schedule weekly rebuild
Note
See README for full documentation including handling of Postgres updates.
Schedule daily run of DB migration
Always use the Gitlab Service Account from Ansible Vault (username/password & OTP in secrets2.yml), to schedule new jobs! Never use your personal account as this will lead to problems in the future.
Go to Schedules
New schedule
Description “DB migration $VERSION”
Target branch: “releases/$VERSION”
Variable: name:
CI_RUN_SCHEMA_UPGRADE, value:1Save pipeline schedule
Backoffice
Change branch of ${LAST_VERSION}
Add new Version (see https://tocco.ch/tocco/e/Version/list)
Add record for new test installation / archive records of deleted installations (see https://tocco.ch/tocco/e/Installation/list)
Client release
Create release branch
Head over to the tocco-client Repository and create a new release branch based on the current master revision. Replace ${VERSION} with the version number without any characters which aren’t numeric (e.g. 2.18 -> 218).
git checkout -b nice-releases/${VERSION} && git tag auto-merge/${VERSION} && git push origin nice-releases/${VERSION} && git push origin auto-merge/${VERSION}
In scripts/variables.json set testSystemUrl to https://test${VERSION}.tocco.ch (needed by the storybook)
and requireCherryPickInCommitMessage to true that always a Cherry-pick: Up/No is required in the commit message on the release branch.
Create a new merge request branch workflow under Client Repo Settings -> Merge Requests -> Merge request branch workflow.
Set master branch to next version
Checkout the master branch again and replace the nice version inside the file variables.json. This change must be committed, pushed and a merge request should be opened.
Run the Gitlab CI on the master branch after merging the opened merge request using the “Daily Master (SonarQube, Auto Release)” job. The packages are released for the new version and new npm dist tags are created.
On the master branch of the backend replace the old release tag with the new one in all package.json (Example commit).
Point previous release branch to new release branch
On the previous release branch (e.g. 217 when releasing 218) change in scripts/variables.json targetBranch to nice-releases/${VERSION}.
Protected branch
Protect created release branch under Settings -> Repository -> Protected branches.
Create a new protection rule:
Branch:
nice-releases/${VERSION}Allowed to merge: Developers and Maintainers
Allowed to push and merge: Roles No one & Users Tocco admin
Allowed to force push: Off
Require approval from code owners: Off
Gitlab CI
Create a new auto release pipeline schedule for the new release branch under Build -> Pipeline schedules.
Check if the access token is valid for more than 4 months under Settings -> Access tokens. If necessary create a new token (only expiration date is different to existing token):
Token name: CI
Expiration date: one year from today
Role: Maintainer
Scope: api
Replace the value of the CI variable GITLAB_ACCESS_TOKEN under Settings -> CI/CD -> variables.
Remove old access token under Settings -> Access tokens.
Verify that the access token is working (e.g. storybook link is posted as comment).
Renew access tokens
Update Access Tokens and API Keys where renewal column is empty (not updated in other task) and token is valid for less than 7 months.
Documentation release
Publish new manual
Attention
You have to clone the ansible repository to access the secrets files mentioned below. You can clone the project with the following command:
git clone git@gitlab.com:toccoag/ansible.git
Go to GitLab subgroup Manual (https://gitlab.com/toccoag/manual)
Create a new repository called docs-publish-${VERSION} (e.g. “docs-publish-3.5”) based on the repository of the latest previous version (e.g. “docs-publish-3.4”) (New project → Create from template → Select tab “Group” → Select the repository of the latest previous version)
Run pipeline to trigger a pages deployment (Menu CI/CD → Pipelines → Click Run pipeline)
Add domain ${VERSION}.docs.tocco.ch (e.g. “305.docs.tocco.ch”) to deployed pages
Menu Settings → Pages → Click New Domain → Enter new domain (e.g. “305.docs.tocco.ch”) → Click Create New Domain
Add ALIAS and TXT DNS entries according to the Gitlab instructions. DNS is available under https://cockpit.nine.ch (use your personal nine account)
Note
It will take a few minutes or longer until the SSL certificate is properly issued
Add domain latest.docs.tocco.ch to deployed pages
Add the domain latest.docs.tocco.ch just like you added the other one in the previous step
Remove the latest.docs.tocco.ch domain from the previously latest docs pages.
Note
https://sysdoc.tocco.ch uses this domain for links to manual contents.
Site Search can be configured on https://control.freefind.com and is registered by admin@tocco.ch for https://documentation.tocco.ch. Username and password can be found in the Bitwarden collection dev and devops.
Set an additional starting point in “/Build Index/Set starting point” to ensure that the subdomain is indexed.
Define a new subsection in “/Build Index/Define subsections” to ensure that user can search inside a specific documentation.
Restart indexing immediately by “/Build Index/Index now”.
Done! The manual publication is ready now.
Attention
Note that it still serves the contents of the latest version, as the copied repository contains these contents. Once the content in the repository gets replaced with the new files, it will be published automatically.
Translation release
Add release to existing integration
Translations are managed in crowdin and are synchronized with gitlab. To add a new release branch to crowdin you can add it as follows: Readd integration (new access token)
Log in with our crowdin admin user (credentials in bitwarden). There might be an e-mail confirmation when you first log in (e-mail address = username)
Open the gitlab integration of the “Tocco-Uebersetzungen” project (https://crowdin.com/project/tocco-uebersetzungen/integrations/system/gitlab)
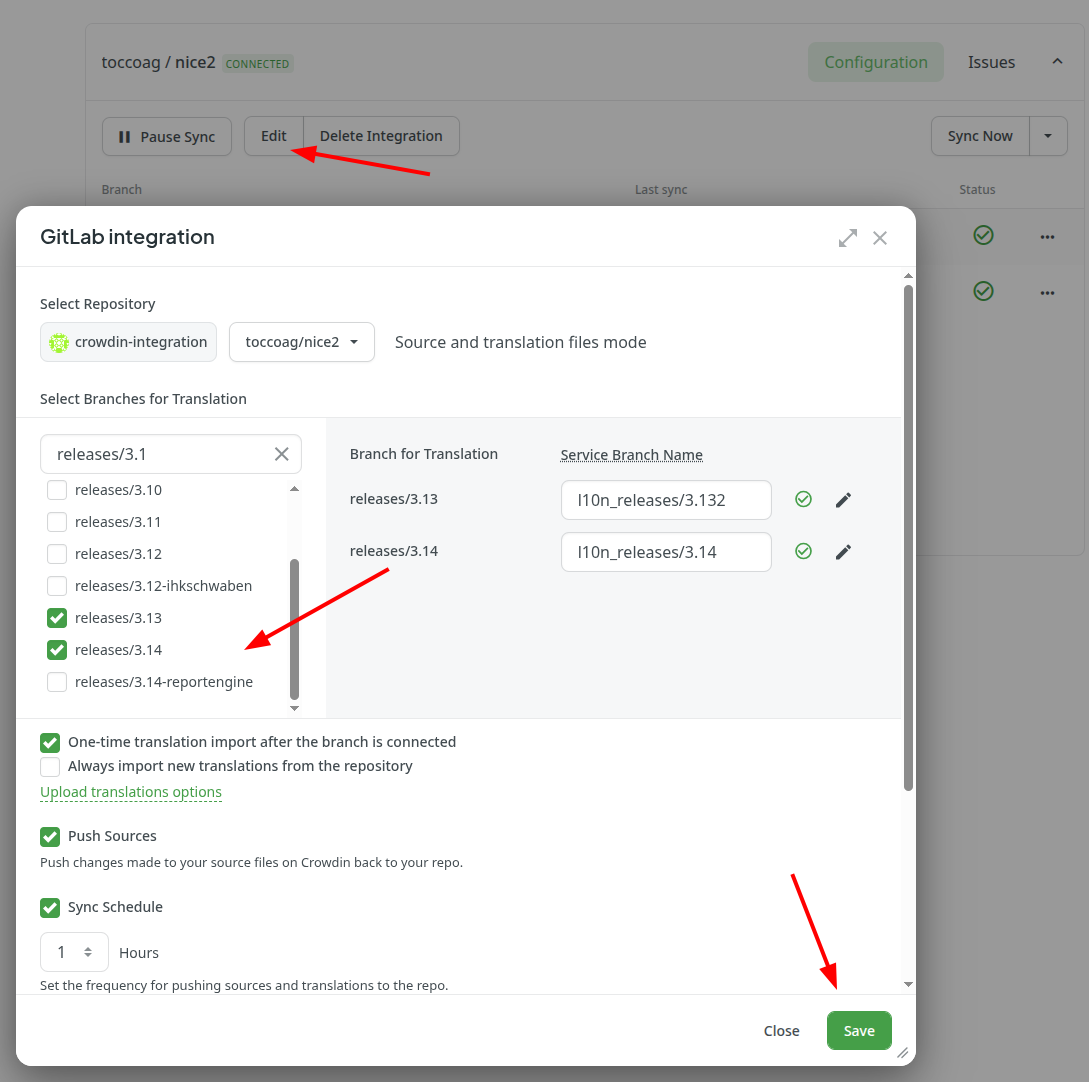
If everything is running (e.g. it shows connected), edit the integration and add the new branch as shown on the screenshot below, if not, continue with: Readd integration (new access token)
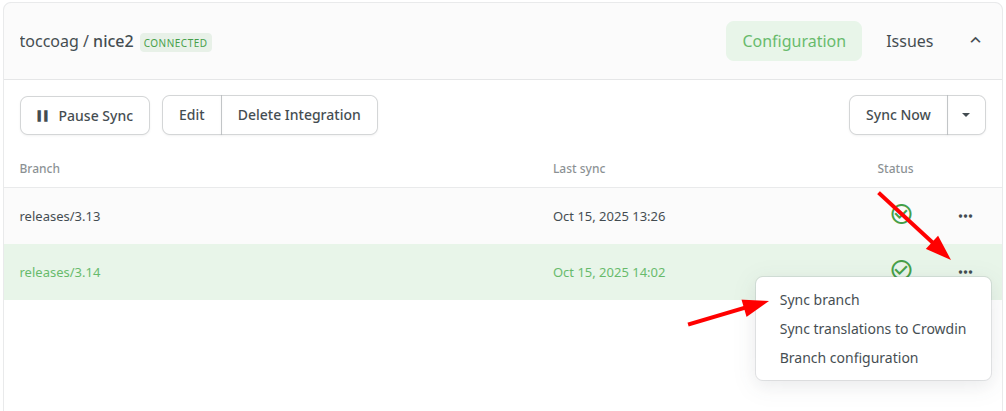
Start synchronisation for the new branch
Readd integration (new access token)
Attention
Make sure that all translations of previous releases are merged.
Remove translation branches in gitlab repository (e.g.
l10n_integration/releases/3.13).Revoke existing
crowdin-integrationaccess tokens in the gitlab repositoryCreate a new access token as follows:
Token name:
crowdin-integrationExpiration date: as far in the future as possible
Role:
MaintainerScopes:
api,write_repository
Log in with our crowdin admin user (credentials in bitwarden). There might be an e-mail confirmation when you first log in (e-mail address = username)
Open the gitlab integration of the “Tocco-Uebersetzungen” project (https://crowdin.com/project/tocco-uebersetzungen/integrations/system/gitlab)
Delete all existing Integrations (
Delete Integration)
Attention
Only one integration for each repository is permitted. This means, this doesn’t work if the previous integrations were not deleted!
Add new integration as follows:
Click
Use personal access token (optional)and paste the personal access tokenClick
Set Up Integrationand selectSource and translation files modeSelect the nice2 repository
Duplicate handling:
Show within a version branch (strict detection)Select all integration release branches starting at 3.13 (e.g.
integration/releases/3.13,integration/releases/3.14, …)Check the translation branches, they should be
l10n_integration/releases/3.13,l10n_integration/releases/3.14, …Select
Push SourcesSave
Start synchronisation of the integration